Posts

Helen Bullock

Image
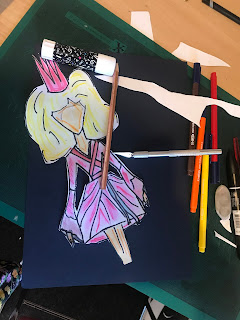
We heard Helen talk about her work and she gave us lots of information about portfolios which was so useful. To start the drawings off we first had to draw the picture from the screen shown. we had around five minuets to do this Helen gave us the tip of always starting at the head so we can fill the whole page. I had enough time to add in all the detail and edit out any parts i wasn't happy with as well as adding some colour.  We then had to draw another picture very similar to the first one however we had much less time this time there was no time to edit out parts and barely enough time to think about what I was drawing. This was so we couldn't fuss over our drawings so much. Later on Helen said that its good to have mistakes in our work and we should rub them out we should work around them as they can often lead to a more creative and interesting piece all together.  We then had to draw three images that were shown one at a time and we only had a couple of minuets to draw th

Eve Cavell drawing

Image
 It was really interesting to listen to eve and hear how she takes things and finds a way to incorporate them into her art. I also loved her style of art it was so different to anything ive seen and didn't focus on looking exactly like the picture she may have used for inspiration. The drawings were all about funny angles and big proportions which was really fun.  We were asked to pick a runway look to copy and draw out. Once drawn we used watercolours to colour it in which Eve also uses a lot on her work. I've not had to much experience with watercolours but i really enjoyed getting to use them. I had to make sure not to over draw it which i have a habit of doing and then i end up ruining it so it was nice to keep in simple.  Once it was all drawn i stuck it down on some cardboard to make it stronger and we were asked to create a backdrop for it similar to what Eve does with her work.  I have a floral tapestry hanging in my bedroom and the colours on it were perfect for my dra

Bedroom floor productions.

Image
I really enjoyed this one because i feel that drawing isnt really my strongestt but that didnt seem to matter as what we were going to create was really practical. first we did a warm up to get us in the right frame of mind to create quickly.  We were asked to bring in four different items of clothing and a shoe. With the clothing we needed to pick out a pattern from the fabric. Some may have already have a pattern printed on or it could be the actually fabric its self. I used a few including a knitted cardigan where i tried to follow the stictching and also some gingham trousers. Once we had selected our items we then had to draw the patterns to cover the whole page. These were timed drawings and with each one we had less time. We needed to have four different patterns on four different sheets of paper all of various textures and heaviness in the pattern for example there may be a pattern with lots of space and white parts therefor we would also need a pattern without lots of space so
Image
 Using indesign. We started by selecting images we wanted to use for our front page. once the images were selected we had to select and drag them from the file and put them in place. The blue outline around the image is the boarder of how far the image can go and the yellow outline is the actual picture.  Then we were shown how to add text to the page by selecting the text box and making it the right size and then we chose what font to use and we could change the colour to. We added a background to make it look  more interesting by selecting the rectangle tool and making a box big  enough to cover the entire page. Then we were able to change the colour of the box. Once the colour was change it blocked all the images from being seen so we had to right click the coloured box and send it to back so that the image and the writing could be seen. Then we added more pages and added some texts boxes to represent pictures and text. The boxes with filled colour were to represent pictures and emp
Image
 Introduction to Indesign  We were shown the basics of how to use indesign to help us when it comes to using it for our editorial assignment. first we went to www.pexels.com and selected and image we wanted to use. It was a really useful website to know about because it had so many profession photographs all for free to download. once we had selected our images we opened indesign and chose print and then A4 we added more pages as we went by using the + sign at the bottom of the page. Once our picture was uploaded we used it to take up exactly half of the screen using the pink line to show us when we were at the middle.  We then learnt how to change the colour of the whole page by creating a rectangle over the whole page and image using the rectangle tool and then selecting the colour. I found i lost my image behind the rectangle so we had to send it to back so it would bring the image forward.  After this we added text by selecting a text box and using random text generator just so we
Image
 Making a logo using illustrator. First we sleeted the polygon shape and created a diamond shape and rotated it 90 degrees and then used direct select to keep all the angles the same when making the image bigger. we drag selected the bottom half of the diamond and enlarged it. then we made a copy of this original shape by selecting the shape and pressing control C to copy and control V to past. Hold shift and move the new shape in the middle of the original shape but make it smaller. Then we used the line tool to we connected both shapes together using the anchor points.  By selecting unite it fused all the lines into one shape instead of two big shapes and lines. using the ccopies we had already made we could then change the colour whilst keeping the original  shape as one.

Making a giff

Image
 Today we learnt how to make a giff using photoshop. firstly we had to set the size to 12 by 12 and the resolution to 300 for a giff. With a blank screen in front of us we opened window and find timeline. we had to then select 4 images that could be used for our giff. we had to layer them all one on top of the other to create our separate images for our giff. Once they were all in place we could change the colour to make it look more interesting by pressing command I to invert the colour or command U to change the saturation.  Once we had changed each colour for each picture we had to start to animate. to do this we had to select "create frame animation. Then by clicking add frame it allows you to add the layers to create more you have to add more layers and to select which once you wish to use you have to add and hide layers sing the eye. you can also change the speed and add text and drawing by the same process off adding layers and hiding them suing the eye when adding more fra